ที่มา: dev.to
เพื่อให้การทำงานเป็นทีมมีประสิทธิภาพมากขึ้น เราควรใส่ใจกับ Commit Message ของ Git
เพราะ Commit Message ช่วยในการสื่อสารกับเพื่อนร่วมทีม หรือแม้แต่เป็นการสื่อสารกับตัวเราเองในอนาคต เพื่อให้รู้ว่ามีการเปลี่ยนแปลงอะไรบ้าง จะเกิดผลกระทบอะไรบ้าง
บล็อกนี้นำเสนอรูปแบบหนึ่งสำหรับ Commit Messageของ Git ที่น่าสนใจ
รูปแบบของ Commit Message
!type(?scope): !subject❗คือ บังคับว่าต้องมี
❓คือ มีหรือไม่มี ก็ได้
Type
- ❗ต้องมีเสมอ
จากรูปแบบ Commit Message :
!type(?scope): !subjectType บอกว่าการเปลี่ยนแปลงนี้ทำเกี่ยวกับอะไร โดยมี Types ให้เลือก ดังนี้
- test
- สร้างหรือเปลี่ยนแปลง Test Code
- feat
- เพิ่ม Feature ใหม่ สำหรับ Project
- refactor
- ทำ Code Refactoring โดยไม่กระทบกับ Logic หรือ Rules
- style
- เมื่อมีการเปลี่ยน Code Style หรือมีการ Formatting Code
- fix
- แก้ Error หรือ Bugs ในระบบ
- docs
- เปลี่ยนแปลง Document ของ Project
- chore
- มีการเปลี่ยนแปลงที่ไม่เกี่ยวกับ Code หรือ Test
- เป็นการเปลี่ยนแปลงด้าน Development Dependency หรือ Tools เช่น
- eslint
- prettier
- .gitignore
- build
- มีการเปลี่ยนแปลงที่ส่งผลต่อ Build Process หรือ External Dependency
- เปลี่ยนแปลง Dependency ของ Project
- perf
- การเปลี่ยนแปลงที่เกี่ยวข้องกับการเพิ่ม Performance ของระบบ
- ci
- เปลี่ยนแปลง CI/CD Configuration File เช่น
- Circle
- Travis
- Jenkins
- เปลี่ยนแปลง CI/CD Configuration File เช่น
- revert
- มีการย้อยกลับไปที่ Commit ก่อนหน้านี้
📝 Notes (เกี่ยวกับ Type)
- ใน Commit message ต้องมี Type เสมอ
- ต้องมีแค่ 1 Type ต่อ 1 Commit
- ถ้าไม่รู้จะใช้ Type ใด เป็นไปได้ว่า Commit ใหญ่เกินไป
- ควรแยก Commit ให้เล็กพอที่จะเลือก Type ได้
- และแต่ละ Commit ต้องเป็นการเปลี่ยนแปลงเพียงเรื่องเดียว
Subject
- ❗ต้องมีเสมอ
จากรูปแบบ Commit Message :
!type(?scope): !subjectSubject ต้องใช้ประโยคเชิงคำสั่งที่ขึ้นต้นด้วย Verb.1 (โดยไม่มี to) แทนที่จะเป็น Past Tense
เพื่อบอกทีมว่า commit นี้จะทำอะไร ถ้าเรา apply มัน:
If applied, this commit will do something according to this message
เปรียบเทียบ 2 commit message นี้ดู
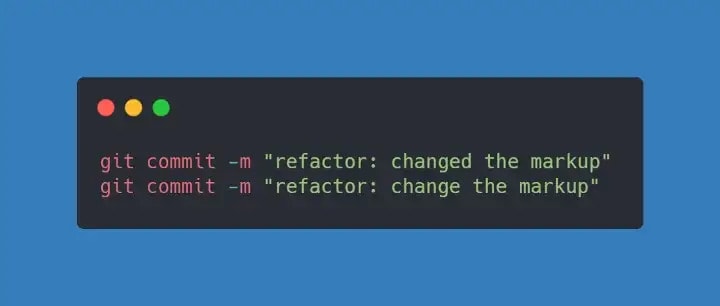
จะเห็นว่า
“If applied, this commit will change the markup” ✅, ดู make sense กว่า
“If applied, this commit will changed the markup” 🟥
นอกจากนี้การเขียน Subject ควรเขียนสั้น ๆ กระชับ โดยทั่วไปไม่ควรเกิน 50 ตัวอักษร ถ้าต้องการเขียนยาวกว่านี้ให้ไปเขียนใน Body ของการ Commit
Scope
- ❓ มีหรือไม่มี ก็ได้
- บอก Context หรือบริบทของ Commit นี้
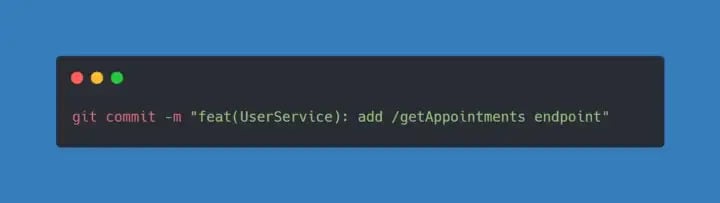
จากรูปแบบ Commit Message :
!type(?scope): !subjectจากรูปแบบที่เขียนมาก่อนหน้านี้ เราจัดการ Commit Message ให้ชัดเจนด้วยการใช้
- Type บอกประเภทของการเปลี่ยนใน Commit นี้
- Subject บอกอย่างชัดเจนว่าจะเกิดอะไรขึ้น เมื่อ Apply Commit นี้
แม้ว่า Scope ไม่จำเป็นต้องมีก็ได้ แต่มันช่วยบอก Context ของ Commit นี้เพิ่มเติมได้
และยังช่วยลดภาระของ Subject ลงได้ ทำให้ Subject สั้นและกระชับกว่าเดิม
หมายเหตุ :
- Scope ต้องใส่ใน “วงเล็บ” เช่น (Scope) เสมอ
- Scope จะถูกแบ่งแยกด้วย “/” (Slash) ได้ เช่น
- (module/AuthService)
- (package/PackageName)
ตัวอย่าง
แนวปฏิบัติเพิ่มเติมเพื่อการ Commit ที่ดี
- Commit บ่อย ๆ และ เล็ก ๆ
- ช่วยให้การ review code ง่ายขึ้น
- ช่วยให้ย้อนกลับไปยังจุดที่ต้องการได้ง่าย
- ช่วยให้การ merge ง่ายขึ้น เพราะเมื่อเกิด merge conflict จะมี code ไม่มากที่ต้องพิจารณา
- การเปลี่ยนแปลง code ทีละน้อย ทำให้คุณภาพโค้ดดีขึ้น พัฒนาขึ้นอย่างต่อเนื่อง
- การเขียน Body ใน Commit
- เว้น 1 บรรทัดจากหัวข้อ
- ควรเขียนให้สั้น และกระชับเช่นกัน
- ควร Wrap ความยาวต่อ 1 บรรทัด ไม่เกิน 72 ตัวอักษร
- ควรเขียนอธิบายว่าทำอะไร และทำไม (What + Why)
- ขึ้นต้นประโยคด้วยตัวพิมพ์ใหญ่ และปิดท้ายประโยคด้วยจุด
- Commit Message เป็นเพียงเครื่องมือหนึ่งในการสื่อสาร ทีมพัฒนาซอฟต์แวร์ยังจำเป็นต้องคุยกัน สื่อสารกันบ่อย ๆ
